Negative film as filter
 The heart of the
conversion is the replacement of the built in filter the removes most
of the infrared light with a piece of overexposed old negative film
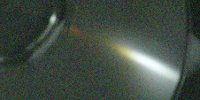
that instead removes most of the visible light. A quick test with the
diffraction pattern of the light of a halogen bulb from a compact disk
shows that this modification does indeed have the desired
effect. There is a bit of red light still coming through (not that
surprising, given that color negative film is tinted red) that is
visible near the center of the disk, but most of of the light comes
from a part of the disk further from the center that appears dark to
the unaided eye. There is also a noticeble gap between the red end of
the visible spectrum and the cutoff of the improvised filter, which is
slightly unfortunate, as it limits the amount of infrared light
hitting the sensor, forcing you to use some combination of long
shutter speed, high ISO and large apertures. But the resulting
sensitivity is still far better than what you get if you just put an
IR-filter in front of an unmodified digital camera. In that case you
will have to use
The heart of the
conversion is the replacement of the built in filter the removes most
of the infrared light with a piece of overexposed old negative film
that instead removes most of the visible light. A quick test with the
diffraction pattern of the light of a halogen bulb from a compact disk
shows that this modification does indeed have the desired
effect. There is a bit of red light still coming through (not that
surprising, given that color negative film is tinted red) that is
visible near the center of the disk, but most of of the light comes
from a part of the disk further from the center that appears dark to
the unaided eye. There is also a noticeble gap between the red end of
the visible spectrum and the cutoff of the improvised filter, which is
slightly unfortunate, as it limits the amount of infrared light
hitting the sensor, forcing you to use some combination of long
shutter speed, high ISO and large apertures. But the resulting
sensitivity is still far better than what you get if you just put an
IR-filter in front of an unmodified digital camera. In that case you
will have to use ![]() exposure times in excess of one second even in bright
sunlight. With the negative film as filter in a modified camera, hand
held shooting isn't totally impossible.
exposure times in excess of one second even in bright
sunlight. With the negative film as filter in a modified camera, hand
held shooting isn't totally impossible.
It might be worthwhile to look for another filter material with a higher cutoff frequency to get a more sensitive system, or just replace the filter with with something completely transparent and experiment with removable filters in front of the lens. But for my first experiments I went with the simplest solution and the cheapest filter I could find, and the results are still quite promising.
Using CHDK
One factor that makes an old PowerShot attractive for
this kind of experiments is the avalability of the ![]() Canon Hackers Development Kit
CHDK that provides several enhanced functions. Three features are most
valuable:
Canon Hackers Development Kit
CHDK that provides several enhanced functions. Three features are most
valuable:
- Auto-ISO mode. I can tell the camera to crank up ISO instead of reducing shutter speed, giving me more of a chance to get acceptable pictures without a tripod.
- The capability to shoot RAW or DNG. The negative film results in images with a strong red or purple tint, and the exposure is not always optimal. RAW gives you a few more bits per pixel that are useful when adjusting the curves to get the result you want.
Shooting in RAW
To illustrate the last point: The following image shows a traffic
scene in Hamburg as seen and converted to JPG by the camera. You can
see the very brigth foliage that is typical for infrared photograhy,
as well as some of the visible light still getting through the filter
from the traffic lights. But the overall chromaticity is a bit dingy.
![[Image as
produced by the camera]](vor-dammtor-orig.jpg)
The same scene after changing the white balance and adjusting the
brightness curve to get a more evenly spread histogram of the DNG file
in UFRaw looks quite a bit more like what you expect from an infrared
picture:
![[Image after
correcting colors in UFRaw]](vor-dammtor-corr.jpg) Since the IR-sensitivity of all three types of color sensors is almost
the same, the resulting pictures are not very colorful. So you may get
more interesting result if you increase the saturation in UFRaw (not
done on the picure above). This will make the trees stand out clearer
against the sky and also restore some of the remaining chromaticity of
the visible light still passing through the filter, like the traffic
lights and the blue sign in the top left corner.
Since the IR-sensitivity of all three types of color sensors is almost
the same, the resulting pictures are not very colorful. So you may get
more interesting result if you increase the saturation in UFRaw (not
done on the picure above). This will make the trees stand out clearer
against the sky and also restore some of the remaining chromaticity of
the visible light still passing through the filter, like the traffic
lights and the blue sign in the top left corner.
Of course you could perform similar operations on the JPG
produced by the camera, but the quality difference is clearly visible
if you look at the picture at its original size. This is a part of a
modified JPG image with clearly visible noise:
![[Crop of the
modified JPG image]](orig-size-jpg.jpg)
There is some noise in the image generated from the DNG file, too,
but is much less visible:
![[Crop of the
modified DNG image]](orig-size-dng.jpg)
The pseudo-HDR trick
Another nice thing about shooting RAW is the possibility to use the
![]() pseudo-HDR trick with ufraw and enfuse: first you use
ufraw-batch to produce seven copies of your image with appropriate
white balance and saturation and exposure correction from -3 to 3 steps,
then use enfuse to combine them back into one image.
pseudo-HDR trick with ufraw and enfuse: first you use
ufraw-batch to produce seven copies of your image with appropriate
white balance and saturation and exposure correction from -3 to 3 steps,
then use enfuse to combine them back into one image.
The following script automates the process. Using this script may or may not produce better results than manual fiddling with the curves, depending on the input image. One thing to remember is that UFRaw remembers all its settings that you do not explicitly change, so you get the best results if you first fiddle with the image in UFRaw to get the best result you can and then run this skript.
The scpipt is not IR specific (in fact, the default to use camera white balance is decidedly useless for a modified camera, you have to use the -a option to use auto white balance). By default, it generates images with exposure correction from -3 to +3 steps, you can adjust this with the -l and -h parameters. You can set the saturation with the -s option, or specify a parameter file for UFRaw if you do not want to use the values used on the last file saved with UFRaw. All command line arguments after the name of the file to process are passed to enfuse.
#!/bin/bash
low=-3
high=3
wb="camera"
OPTS=""
conffile=""
while getopts 'l:h:f:s:a' OPTION
do
    case $OPTION in
	l) low="$OPTARG"
	    ;;
	h) high="$OPTARG"
	    ;;
	f) conffile=$OPTARG
	    ;;
	s) OPTS="$OPTS --saturation=$OPTARG"
	    ;;
        a) wb="auto"
	    ;;
	?) printf "Usage: %s: [-l low] [-h high] [-f ID-file] \
 [-s saturation] [-a] filename [enfuse args ...]\n" \
           $(basename $0) >&2
	    exit 2
	    ;;
    esac
done
if [ x$conffile == "x" ] ; then
    OPTS="--wb=${wb} ${OPTS}"
else
    OPTS="--conf=${conffile}"
fi

shift $(($OPTIND - 1))
filename=$1
filebase=`basename "$1" | sed 's/\.\([^\/\.]*$\)//'`
files=""
for i in `seq $low $high`; do
    files="$files ${filebase}_${i}_tmp.tiff"
    pfiles="$files ${filebase}_${i}_tmp.ufraw"
done
rm -f $files ${filebase}_hdr.tiff
shift
for i in `seq $low $high`; do
  ufraw-batch ${OPTS} \
        --exposure=$i \
        --output=${filebase}_${i}_tmp.tiff \
        --out-type=tiff $filename
done
enfuse "$@" -o ${filebase}_hdr.tiff ${files}
rm -f $files $pfiles